1
2
3
4
5
sudo apt install -y openjdk-11-jdk

wget https://archive.apache.org/dist/kafka/2.1.0/kafka_2.12-2.1.0.tgz

tar xf kafka_2.12-2.1.0.tgz
1
2
3
4
5
6
7
# 查看消费组
/opt/services/kafka/bin/kafka-consumer-groups.sh --bootstrap-server kf1:9095,kf2:9095,kf3:9095 \
--list

# 查看消费Lag
/opt/services/kafka/bin/kafka-consumer-groups.sh --bootstrap-server kf1:9095,kf2:9095,kf3:9095 \
--describe --group notification
1
2
3
4
5
6
7
8
9
10
11
12
13
14
15
16
17
18
19
20
21
22
23
24
25
26
27
28
29
30
import subprocess

kafka_path = '/opt/services/kafka/bin/'
kafka_servers = 'kf1:9095,kf2:9095,kf3:9095'
consumer_group = 'notification'


def parse_lag(output):
lag = 0
output_without_empty_lines = "\n".join(
[line for line in output.split("\n") if line.strip()])
for line in output_without_empty_lines.splitlines():
if "LAG" in line:
continue
lag_str = line.split()[4]
if '-' not in lag_str:
lag += int(lag_str)
return lag


def kafka_monitor():
lag = 0
command = f'{kafka_path}kafka-consumer-groups.sh --bootstrap-server {kafka_servers} --describe --group {consumer_group}'
output = subprocess.check_output(
command, shell=True, universal_newlines=True)
lag = parse_lag(output)
return lag


print(kafka_monitor())

ChatGPT-Next-Web

1
2
3
4
5
docker run -d -p 3000:3000 \
-e OPENAI_API_KEY=sk-xxxx \
-e CODE=chatgptnextweb2024 \
--name chatgpt-next-web \
yidadaa/chatgpt-next-web

LobeChat

1
2
3
4
5
docker run -d -p 3210:3210 \
-e OPENAI_API_KEY=sk-xxxx \
-e ACCESS_CODE=lobechat2024 \
--name lobe-chat \
lobehub/lobe-chat

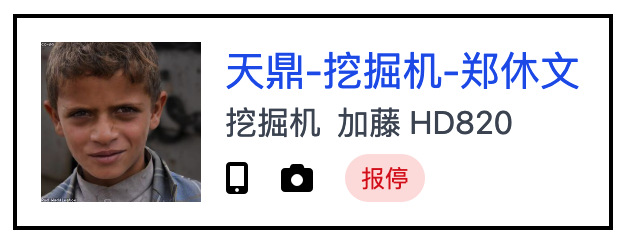
案例 1

tailwindcss-01.png

1
2
3
4
5
6
7
8
9
10
11
12
13
14
15
16
17
18
19
20
21
22
23
24
25
26
27
28
29
30
31
32
33
<!DOCTYPE html>
<html>
<head>
<meta charset="UTF-8" />
<meta name="viewport" content="width=device-width, initial-scale=1.0" />
<script src="https://cdn.tailwindcss.com"></script>
<link
href="https://cdn.bootcdn.net/ajax/libs/font-awesome/6.4.2/css/all.min.css"
rel="stylesheet"
/>
</head>
<body>
<div class="flex w-[300px] m-3 p-3 border-2 border-black">
<img class="w-20 h-20" src="https://loremflickr.com/320/320/boy" />
<div class="flex flex-col justify-center ml-3">
<p class="text-xl text-blue-600">天鼎-挖掘机-郑休文</p>
<div class="flex">
<h2 class="text-base text-gray-600">挖掘机</h2>
<p class="text-base text-gray-600 ml-2">加藤 HD820</p>
</div>
<div class="flex mt-1">
<i class="fas fa-mobile-alt text-base"></i>
<i class="fas fa-camera text-base ml-4"></i>
<div
class="flex items-center text-xs text-red-600 bg-red-100 ml-4 px-2 rounded-xl"
>
报停
</div>
</div>
</div>
</div>
</body>
</html>

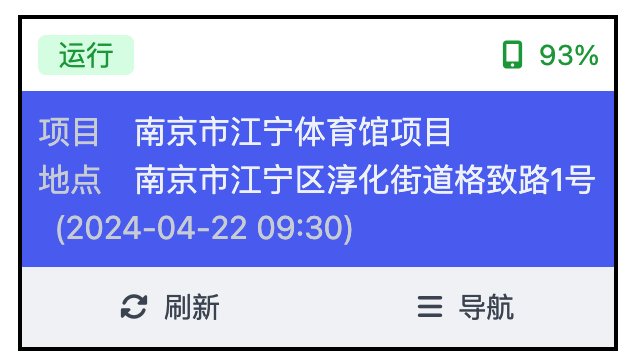
案例 2

tailwindcss-02.png

1
2
3
4
5
6
7
8
9
10
11
12
13
14
15
16
17
18
19
20
21
22
23
24
25
26
27
28
29
30
31
32
33
34
35
36
37
38
39
40
41
42
43
44
45
46
47
48
49
50
51
52
<!DOCTYPE html>
<html>
<head>
<meta charset="UTF-8" />
<meta name="viewport" content="width=device-width, initial-scale=1.0" />
<script src="https://cdn.tailwindcss.com"></script>
<link
href="https://cdn.bootcdn.net/ajax/libs/font-awesome/6.4.2/css/all.min.css"
rel="stylesheet"
/>
</head>
<body>
<div class="flex flex-col w-[300px] m-3 border-2 border-black">
<div class="flex items-center p-2">
<div
class="flex justify-center text-sm text-green-600 bg-green-100 w-12 rounded"
>
运行
</div>
<div class="flex ml-auto w-12">
<i class="fas fa-mobile-alt text-sm text-green-600"></i>
<p class="text-sm text-green-600 ml-2">93%</p>
</div>
</div>
<div class="flex flex-col p-2 bg-[#5B75F2]">
<div class="flex">
<p class="text-base text-gray-300">项目</p>
<p class="text-base text-slate-100 ml-4">南京市江宁体育馆项目</p>
</div>
<div class="flex">
<p class="text-base text-gray-300">地点</p>
<p class="text-base text-slate-100 ml-4">
南京市江宁区淳化街道格致路1号
</p>
</div>
<div class="flex">
<p class="text-base text-gray-300 ml-2">(2024-04-22 09:30)</p>
</div>
</div>
<div class="flex">
<div class="flex items-center justify-center w-1/2 h-10 bg-gray-100">
<i class="fas fa-sync-alt text-sm text-gray-600"></i>
<p class="text-sm text-gray-600 ml-2">刷新</p>
</div>
<div class="flex items-center justify-center w-1/2 h-10 bg-gray-100">
<i class="fas fa-bars text-sm text-gray-600"></i>
<p class="text-sm text-gray-600 ml-2">导航</p>
</div>
</div>
</div>
</body>
</html>

资源

工具
https://poe.com/
https://www.codium.ai/
https://codegeex.cn/
https://github.com/PaddlePaddle/PaddleOCR
私有化
https://github.com/ChatGPTNextWeb/ChatGPT-Next-Web
https://github.com/lobehub/lobe-chat
多媒体
https://github.com/InstantID/InstantID
https://github.com/chidiwilliams/buzz
https://www.suno.ai/
开发
https://huggingface.co/
https://www.langchain.com/
https://www.llamaindex.ai/
https://mediapipe-studio.webapps.google.com/home
https://github.com/microsoft/semantic-kernel
书籍
https://aitutor.liduos.com/
https://github.com/chidiwilliams/buzz
https://www.suno.ai/

HuggingFace The platform where the machine learning community collaborates on models, datasets, and applications

文本摘要

  • summery.py
1
2
3
4
5
6
7
8
9
10
11
12
13
14
15
16
17
18
19
20
21
22
23
24
25
26
from transformers import pipeline

summarizer = pipeline("summarization")
summary = summarizer(
"""
America has changed dramatically during recent years. Not only has the number of
graduates in traditional engineering disciplines such as mechanical, civil,
electrical, chemical, and aeronautical engineering declined, but in most of
the premier American universities engineering curricula now concentrate on
and encourage largely the study of engineering science. As a result, there
are declining offerings in engineering subjects dealing with infrastructure,
the environment, and related issues, and greater concentration on high
technology subjects, largely supporting increasingly complex scientific
developments. While the latter is important, it should not be at the expense
of more traditional engineering.

Rapidly developing economies such as China and India, as well as other
industrial countries in Europe and Asia, continue to encourage and advance
the teaching of engineering. Both China and India, respectively, graduate
six and eight times as many traditional engineers as does the United States.
Other industrial countries at minimum maintain their output, while America
suffers an increasingly serious decline in the number of engineering graduates
and a lack of well-educated engineers.
"""
)
print(summary)
1
2
3
pip install torch transformers

python summary.py

对中文支持不友好

LangChain The largest community building the future of LLM apps

问答文档

  • data.py
1
2
3
4
5
6
7
8
9
10
11
12
13
14
15
16
17
import bs4
from langchain.text_splitter import RecursiveCharacterTextSplitter
from langchain_community.document_loaders import WebBaseLoader
from langchain_community.vectorstores import Chroma
from langchain_openai import OpenAIEmbeddings

loader = WebBaseLoader(
web_path="https://www.gov.cn/jrzg/2013-10/25/content_2515601.htm",
bs_kwargs=dict(parse_only=bs4.SoupStrainer(
class_=("p1")
))
)

docs = loader.load()
text_splitter = RecursiveCharacterTextSplitter(chunk_size=1000, chunk_overlap=200)
splits = text_splitter.split_documents(docs)
db = Chroma.from_documents(documents=splits, embedding=OpenAIEmbeddings(), persist_directory="./chroma_db")
  • bot.py
1
2
3
4
5
6
7
8
9
10
11
12
13
14
15
16
17
18
19
20
21
22
23
24
25
26
27
28
29
30
31
32
33
34
35
36
37
38
39
40
41
42
43
44
from langchain_core.output_parsers import StrOutputParser
from langchain_core.runnables import RunnablePassthrough
from langchain_community.vectorstores import Chroma
from langchain_openai import ChatOpenAI,OpenAIEmbeddings
from langchain.prompts.prompt import PromptTemplate
from fastapi import FastAPI
from langserve import add_routes

vectorstore = Chroma(persist_directory="./chroma_db", embedding_function=OpenAIEmbeddings())
retriever = vectorstore.as_retriever(search_type="similarity", search_kwargs={"k": 4})
prompt_template_str = """
You are an assistant for question-answering tasks. Use the following pieces of retrieved context to answer the question. If you don't know the answer, just say that you don't know. Use three sentences maximum and keep the answer concise.

Question: {question}

Context: {context}

Answer:
"""
prompt_template = PromptTemplate.from_template(prompt_template_str)

llm = ChatOpenAI(model_name="gpt-3.5-turbo", temperature=0)

def format_docs(docs):
return "\n\n".join(doc.page_content for doc in docs)

rag_chain = (
{"context": retriever | format_docs, "question": RunnablePassthrough()}
| prompt_template
| llm
| StrOutputParser()
)
app = FastAPI(
title="消费者权益智能助手",
version="1.0",
)
add_routes(
app,
rag_chain,
path="/consumer_ai",
)
if __name__ == "__main__":
import uvicorn
uvicorn.run(app, host="localhost", port=8000)
1
2
conda create -n py312 --clone base
conda activate py312
1
2
3
4
5
pip install langchain==0.1.13 langchain-openai bs4 chromadb

export OPENAI_API_KEY="hello-openai"

python data.py
1
2
3
4
5
6
pip install langserve sse_starlette

export OPENAI_API_KEY="hello-openai"

python bot.py
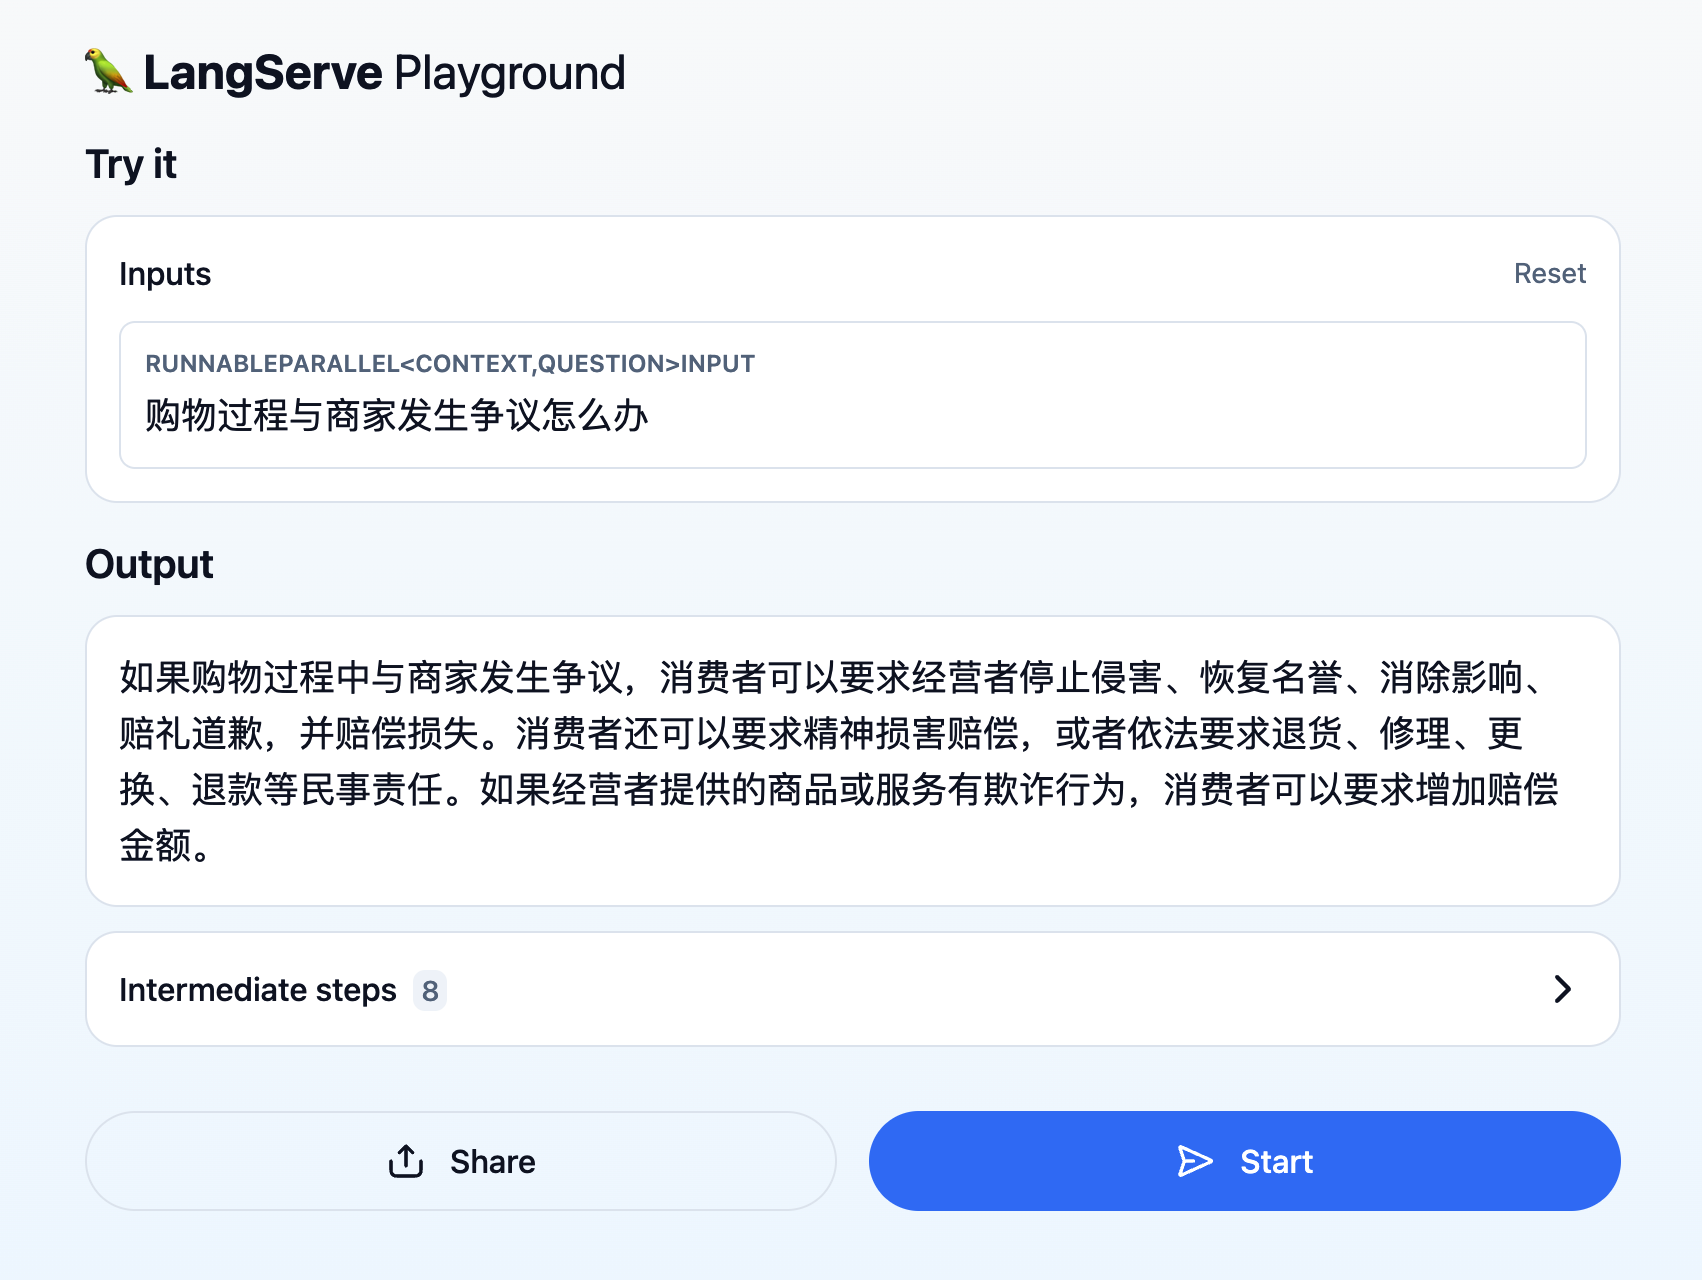
# 浏览器访问http://localhost:8000/consumer_ai/playground/

langchain-01.png

问答数据库

  • lc.sql
1
2
3
4
5
6
7
8
9
10
11
12
13
14
15
16
17
18
19
20
21
22
23
24
25
26
27
28
29
30
31
32
33
34
35
36
37
USE lc;
SET NAMES utf8mb4;
SET FOREIGN_KEY_CHECKS = 0;

DROP TABLE IF EXISTS `machine_drivers`;
CREATE TABLE `machine_drivers` (
`id` bigint(20) NOT NULL,
`machine_id` bigint(20) DEFAULT NULL,
`driver_name` varchar(255) DEFAULT NULL,
`phone` varchar(255) DEFAULT NULL,
PRIMARY KEY (`id`)
) ENGINE=InnoDB DEFAULT CHARSET=utf8mb4;

BEGIN;
INSERT INTO `machine_drivers` VALUES (1, 1, '赛文', '110');
INSERT INTO `machine_drivers` VALUES (2, 2, '艾斯', '119');
INSERT INTO `machine_drivers` VALUES (3, 3, '迪迦', '120');
INSERT INTO `machine_drivers` VALUES (4, 4, '泰罗', '122');
COMMIT;

DROP TABLE IF EXISTS `machines`;
CREATE TABLE `machines` (
`id` bigint(20) NOT NULL AUTO_INCREMENT,
`machine_name` varchar(255) DEFAULT NULL,
`work_time` bigint(20) DEFAULT NULL,
`date` date DEFAULT NULL,
PRIMARY KEY (`id`)
) ENGINE=InnoDB AUTO_INCREMENT=5 DEFAULT CHARSET=utf8mb4;

BEGIN;
INSERT INTO `machines` VALUES (1, '挖掘机A', 1202, '2024-04-19');
INSERT INTO `machines` VALUES (2, '挖掘机B', 0, '2024-04-19');
INSERT INTO `machines` VALUES (3, '挖掘机C', 7200, '2024-04-19');
INSERT INTO `machines` VALUES (4, '推土机A', 5206, '2024-04-19');
COMMIT;

SET FOREIGN_KEY_CHECKS = 1;
1
2
3
4
5
docker run --name langchain -p 3306:3306 -e MYSQL_ROOT_PASSWORD=123456 -d mysql:8.0

docker exec -i langchain mysql -uroot -p123456 <<< "CREATE DATABASE IF NOT EXISTS lc DEFAULT CHARSET utf8 COLLATE utf8_general_ci;"

mycli -uroot < ./lc.sql
  • query.py
1
2
3
4
5
6
7
8
9
10
11
12
from langchain_community.utilities.sql_database import SQLDatabase
from langchain_community.agent_toolkits import create_sql_agent
from langchain_openai import ChatOpenAI

db = SQLDatabase.from_uri("mysql+pymysql://root:123456@127.0.0.1:3306/lc")
llm = ChatOpenAI(model="gpt-3.5-turbo", temperature=0)
agent_executor = create_sql_agent(llm, db=db, agent_type="openai-tools", verbose=True)
agent_executor.invoke("一共有多少台机械?")
# agent_executor.invoke("它们的平均工时是多少?") # 3402
# agent_executor.invoke("它们去0之后的平均工时是多少?") # 4536
# agent_executor.invoke("哪台机械今天没有工作,它的驾驶员是谁?") # 挖掘机B
# agent_executor.invoke("艾斯的手机号码是多少?")
1
2
3
pip install pymysql

python query.py

参考

On-device machine learning for everyone

手势识别

  • HandTrackingModule.py
1
2
3
4
5
6
7
8
9
10
11
12
13
14
15
16
17
18
19
20
21
22
23
24
25
26
27
28
29
30
31
32
33
34
35
36
37
38
39
40
41
42
43
44
45
46
47
48
49
50
51
52
53
54
55
56
57
58
59
60
61
62
63
64
65
66
67
68
69
70
71
72
73
74
75
76
77
78
79
80
81
82
83
84
85
86
87
88
89
90
91
92
93
94
95
96
97
98
99
import cv2
import mediapipe as mp
import time
import math

class handDetector():
def __init__(self, mode=False, maxHands=2, detectionCon=1, trackCon=0.8):
self.mode = mode
self.maxHands = maxHands
self.detectionCon = detectionCon
self.trackCon = trackCon

self.mpHands = mp.solutions.hands
self.hands = self.mpHands.Hands(self.mode, self.maxHands, self.detectionCon, self.trackCon)
self.mpDraw = mp.solutions.drawing_utils
self.tipIds = [4, 8, 12, 16, 20]

def findHands(self, img, draw=True):
imgRGB = cv2.cvtColor(img, cv2.COLOR_BGR2RGB)
self.results = self.hands.process(imgRGB)

print(self.results.multi_handedness) # 获取检测结果中的左右手标签并打印

if self.results.multi_hand_landmarks:
for handLms in self.results.multi_hand_landmarks:
if draw:
self.mpDraw.draw_landmarks(img, handLms, self.mpHands.HAND_CONNECTIONS)
return img

def findPosition(self, img, draw=True):
self.lmList = []
if self.results.multi_hand_landmarks:
for handLms in self.results.multi_hand_landmarks:
for id, lm in enumerate(handLms.landmark):
h, w, c = img.shape
cx, cy = int(lm.x * w), int(lm.y * h)
# print(id, cx, cy)
self.lmList.append([id, cx, cy])
if draw:
cv2.circle(img, (cx, cy), 12, (255, 0, 255), cv2.FILLED)
return self.lmList

def fingersUp(self):
fingers = []
# 大拇指
if self.lmList[self.tipIds[0]][1] > self.lmList[self.tipIds[0] - 1][1]:
fingers.append(1)
else:
fingers.append(0)

# 其余手指
for id in range(1, 5):
if self.lmList[self.tipIds[id]][2] < self.lmList[self.tipIds[id] - 2][2]:
fingers.append(1)
else:
fingers.append(0)

# totalFingers = fingers.count(1)
return fingers

def findDistance(self, p1, p2, img, draw=True, r=15, t=3):
x1, y1 = self.lmList[p1][1:]
x2, y2 = self.lmList[p2][1:]
cx, cy = (x1 + x2) // 2, (y1 + y2) // 2

if draw:
cv2.line(img, (x1, y1), (x2, y2), (255, 0, 255), t)
cv2.circle(img, (x1, y1), r, (255, 0, 255), cv2.FILLED)
cv2.circle(img, (x2, y2), r, (255, 0, 255), cv2.FILLED)
cv2.circle(img, (cx, cy), r, (0, 0, 255), cv2.FILLED)
length = math.hypot(x2 - x1, y2 - y1)

return length, img, [x1, y1, x2, y2, cx, cy]


def main():
pTime = 0
cTime = 0
cap = cv2.VideoCapture(0)
detector = handDetector()
while True:
success, img = cap.read()
img = detector.findHands(img) # 检测手势并画上骨架信息

lmList = detector.findPosition(img) # 获取得到坐标点的列表
if len(lmList) != 0:
print(lmList[4])

cTime = time.time()
fps = 1 / (cTime - pTime)
pTime = cTime

cv2.putText(img, 'fps:' + str(int(fps)), (10, 70), cv2.FONT_HERSHEY_PLAIN, 3, (255, 0, 255), 3)
cv2.imshow('Image', img)
cv2.waitKey(1)


if __name__ == "__main__":
main()
  • AiVirtualMouse.py
1
2
3
4
5
6
7
8
9
10
11
12
13
14
15
16
17
18
19
20
21
22
23
24
25
26
27
28
29
30
31
32
33
34
35
36
37
38
39
40
41
42
43
44
45
46
47
48
49
50
51
52
53
54
55
56
57
58
59
60
61
62
63
64
65
import cv2
import HandTrackingModule as htm
import autopy
import numpy as np
import time

##############################
wCam, hCam = 1280, 720
frameR = 100
smoothening = 5
##############################
cap = cv2.VideoCapture(0) # 若使用笔记本自带摄像头则编号为0 若使用外接摄像头 则更改为1或其他编号
cap.set(3, wCam)
cap.set(4, hCam)
pTime = 0
plocX, plocY = 0, 0
clocX, clocY = 0, 0

detector = htm.handDetector()
wScr, hScr = autopy.screen.size()
# print(wScr, hScr)

while True:
success, img = cap.read()
# 1. 检测手部 得到手指关键点坐标
img = detector.findHands(img)
cv2.rectangle(img, (frameR, frameR), (wCam - frameR, hCam - frameR), (0, 255, 0), 2, cv2.FONT_HERSHEY_PLAIN)
lmList = detector.findPosition(img, draw=False)

# 2. 判断食指和中指是否伸出
if len(lmList) != 0:
x1, y1 = lmList[8][1:]
x2, y2 = lmList[12][1:]
fingers = detector.fingersUp()

# 3. 若只有食指伸出 则进入移动模式
if fingers[1] and fingers[2] == False:
# 4. 坐标转换: 将食指在窗口坐标转换为鼠标在桌面的坐标
# 鼠标坐标
x3 = np.interp(x1, (frameR, wCam - frameR), (0, wScr))
y3 = np.interp(y1, (frameR, hCam - frameR), (0, hScr))

# smoothening values
clocX = plocX + (x3 - plocX) / smoothening
clocY = plocY + (y3 - plocY) / smoothening

autopy.mouse.move(wScr - clocX, clocY)
cv2.circle(img, (x1, y1), 15, (255, 0, 255), cv2.FILLED)
plocX, plocY = clocX, clocY

# 5. 若是食指和中指都伸出 则检测指头距离 距离够短则对应鼠标点击
if fingers[1] and fingers[2]:
length, img, pointInfo = detector.findDistance(8, 12, img)
if length < 40:
cv2.circle(img, (pointInfo[4], pointInfo[5]),
15, (0, 255, 0), cv2.FILLED)
autopy.mouse.click()

cTime = time.time()
fps = 1 / (cTime - pTime)
pTime = cTime
cv2.putText(img, f'fps:{int(fps)}', [15, 25],
cv2.FONT_HERSHEY_PLAIN, 2, (255, 0, 255), 2)
cv2.imshow("Image", img)
cv2.waitKey(1)
1
2
3
4
5
6
7
8
9
mkdir -p ~/miniconda3
curl https://repo.anaconda.com/miniconda/Miniconda3-latest-MacOSX-arm64.sh -o ~/miniconda3/miniconda.sh
bash ~/miniconda3/miniconda.sh -b -u -p ~/miniconda3
rm -rf ~/miniconda3/miniconda.sh
~/miniconda3/bin/conda init zsh

CONDA_SUBDIR=osx-64 conda create -n py37 python=3.7
conda activate py37
conda config --env --set subdir osx-64
1
2
3
pip install autopy mediapipe numpy opencv-python

python AiVirtualMouse.py

目标检测

Python

  • ObjectDetector.py
1
2
3
4
5
6
7
8
9
10
11
12
13
14
15
16
17
18
19
20
21
22
23
24
25
26
27
28
29
30
31
32
33
34
35
36
37
38
39
40
41
42
43
44
45
46
47
48
49
50
51
52
53
54
55
56
57
58
59
60
61
import cv2
import numpy as np
import mediapipe as mp
from mediapipe.tasks import python
from mediapipe.tasks.python import vision

MARGIN = 10 # pixels
ROW_SIZE = 10 # pixels
FONT_SIZE = 1
FONT_THICKNESS = 1
TEXT_COLOR = (255, 0, 0) # red

IMAGE_FILE = 'image.jpg'

def visualize(
image,
detection_result
) -> np.ndarray:
"""Draws bounding boxes on the input image and return it.
Args:
image: The input RGB image.
detection_result: The list of all "Detection" entities to be visualize.
Returns:
Image with bounding boxes.
"""
for detection in detection_result.detections:
# Draw bounding_box
bbox = detection.bounding_box
start_point = bbox.origin_x, bbox.origin_y
end_point = bbox.origin_x + bbox.width, bbox.origin_y + bbox.height
cv2.rectangle(image, start_point, end_point, TEXT_COLOR, 3)

# Draw label and score
category = detection.categories[0]
category_name = category.category_name
probability = round(category.score, 2)
result_text = category_name + ' (' + str(probability) + ')'
text_location = (MARGIN + bbox.origin_x,
MARGIN + ROW_SIZE + bbox.origin_y)
cv2.putText(image, result_text, text_location, cv2.FONT_HERSHEY_PLAIN,
FONT_SIZE, TEXT_COLOR, FONT_THICKNESS)

return image

# STEP 1: Create an ObjectDetector object.
base_options = python.BaseOptions(model_asset_path='efficientdet.tflite')
options = vision.ObjectDetectorOptions(base_options=base_options,
score_threshold=0.5)
detector = vision.ObjectDetector.create_from_options(options)

# STEP 2: Load the input image.
image = mp.Image.create_from_file(IMAGE_FILE)

# STEP 3: Detect objects in the input image.
detection_result = detector.detect(image)

# STEP 4: Process the detection result. In this case, visualize it.
image_copy = np.copy(image.numpy_view())
annotated_image = visualize(image_copy, detection_result)
rgb_annotated_image = cv2.cvtColor(annotated_image, cv2.COLOR_BGR2RGB)
cv2.imwrite("result.png", rgb_annotated_image)
1
2
3
4
5
wget -q -O efficientdet.tflite -q https://storage.googleapis.com/mediapipe-models/object_detector/efficientdet_lite0/int8/1/efficientdet_lite0.tflite
wget -q -O image.jpg https://storage.googleapis.com/mediapipe-tasks/object_detector/cat_and_dog.jpg

conda create -n py38 python=3.8
conda activate py38
1
2
3
pip install mediapipe==0.10.9 numpy opencv-python

python ObjectDetector.py

Android

1
2
git clone https://github.com/googlesamples/mediapipe.git
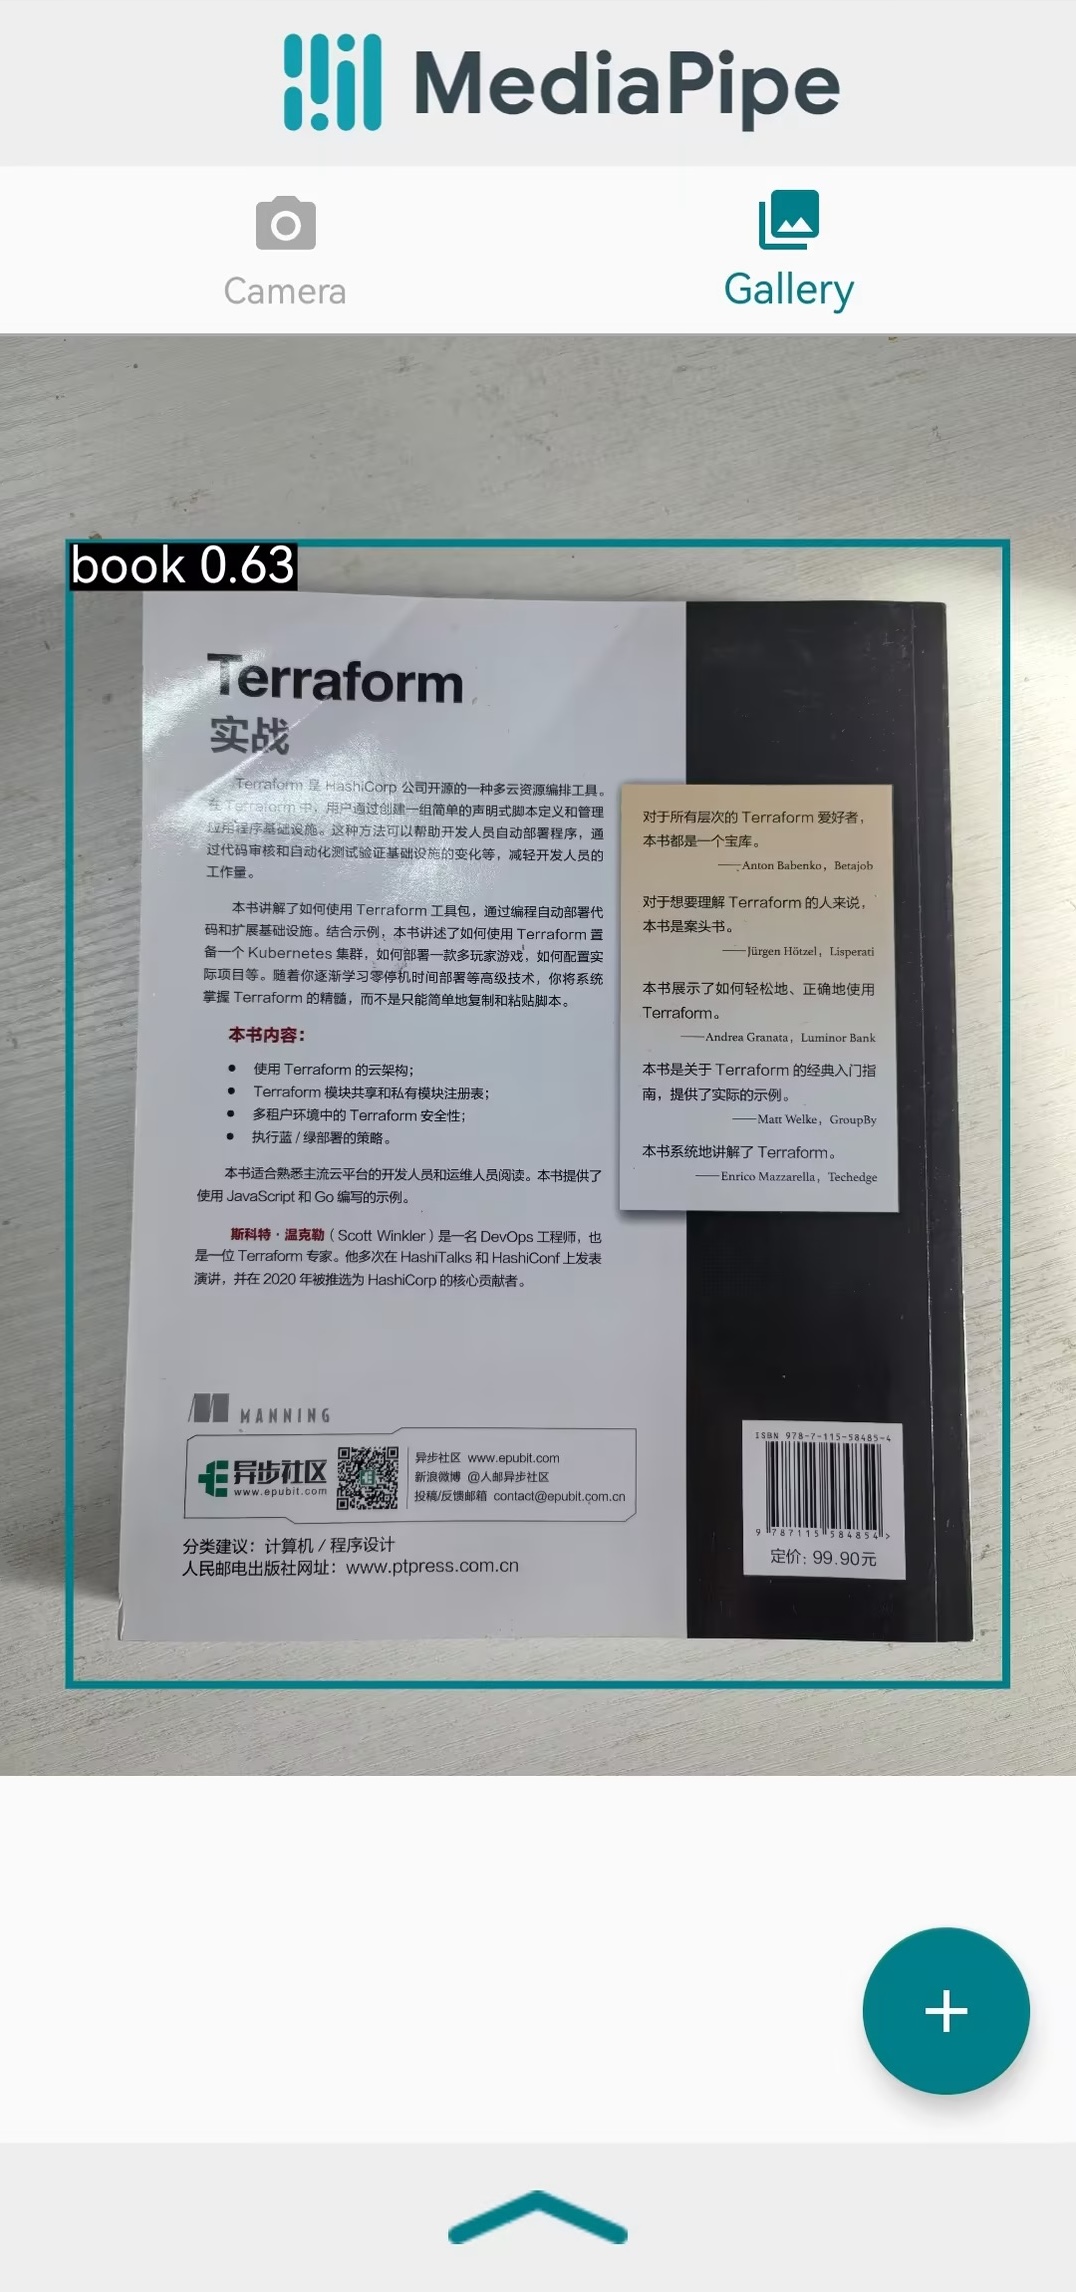
# 使用Android Studio打开项目mediapipe/examples/object_detection/android

mediapipe-01.jpg

参考

OpenCV provides a real-time optimized Computer Vision library, tools, and hardware

摄像头

  • VideoCapture.py
1
2
3
4
5
6
7
8
9
10
11
12
13
14
import cv2

frameWidth = 1280
frameHeight = 720
cap = cv2.VideoCapture(0)
cap.set(3, frameWidth)
cap.set(4, frameHeight)
cap.set(10, 150)

while True:
success, img = cap.read()
cv2.imshow("Result", img)
if cv2.waitKey(1) & 0xFF == ord('q'):
break

人脸识别

  • FaceDetection.py
1
2
3
4
5
6
7
8
9
10
11
12
13
14
import cv2

faceCascade= cv2.CascadeClassifier("Resources/haarcascade_frontalface_default.xml")
img = cv2.imread('Resources/lena.png')
imgGray = cv2.cvtColor(img,cv2.COLOR_BGR2GRAY)

faces = faceCascade.detectMultiScale(imgGray,1.1,4)

for (x,y,w,h) in faces:
cv2.rectangle(img,(x,y),(x+w,y+h),(255,0,0),2)


cv2.imshow("Result", img)
cv2.waitKey(0)

参考

本文的主线 视频流 => 视频墙 => 截屏 => 录像

视频流

1
2
3
4
5
6
7
8
9
10
11
docker run --name srs -p 1935:1935 -p 1985:1985 -p 8080:8080 \
-p 8000:8000/udp -p 10080:10080/udp -d registry.cn-hangzhou.aliyuncs.com/ossrs/srs:5

brew install ffmpeg

# source.flv文件下载自
# https://github.com/ossrs/srs/blob/develop/trunk/doc/source.200kbps.768x320.flv
ffmpeg -re -stream_loop -1 -i /opt/services/source.flv -c copy -f flv -y rtmp://localhost/live/1

# 验证推流是否正常
ffplay http://localhost:8080/live/1.flv

视频墙

1
2
3
4
5
6
7
8
9
10
11
12
13
14
15
16
17
18
19
20
21
22
23
24
25
26
27
28
29
30
31
32
33
34
35
36
37
38
39
40
41
42
43
44
45
46
<!DOCTYPE html>
<html>
<head>
<meta content="charset=utf-8" />
<style>
.centeredVideo {
width: 250px;
height: 250px;
}
</style>
</head>
<body>
<video id="videoElement1" class="centeredVideo" controls autoplay></video>
<video id="videoElement2" class="centeredVideo" controls autoplay></video>
<video id="videoElement3" class="centeredVideo" controls autoplay></video>
<video id="videoElement4" class="centeredVideo" controls autoplay></video>
<video id="videoElement5" class="centeredVideo" controls autoplay></video>
<video id="videoElement6" class="centeredVideo" controls autoplay></video>
<video id="videoElement7" class="centeredVideo" controls autoplay></video>
<video id="videoElement8" class="centeredVideo" controls autoplay></video>
<video id="videoElement9" class="centeredVideo" controls autoplay></video>
<script src="https://cdnjs.cloudflare.com/ajax/libs/flv.js/1.6.2/flv.min.js"></script>
<script>
for (var i = 1; i <= 6; i++) {
var videoElement = document.getElementById("videoElement" + i);
var flvPlayer = flvjs.createPlayer({
type: "flv",
url: "http://localhost:8080/live/" + i + ".flv",
});
flvPlayer.attachMediaElement(videoElement);
flvPlayer.load();
flvPlayer.play();
}
for (var i = 7; i <= 9; i++) {
var videoElement = document.getElementById("videoElement" + i);
var flvPlayer = flvjs.createPlayer({
type: "flv",
url: "http://127.0.0.1:8080/live/" + i + ".flv",
});
flvPlayer.attachMediaElement(videoElement);
flvPlayer.load();
flvPlayer.play();
}
</script>
</body>
</html>

浏览器同域名请求的最大并发数限制通常为 6

阅读全文 »

ERROR 14678 — [http-nio-127.0.0.1-8071-exec-44] o.h.engine.jdbc.spi.SqlExceptionHelper : [http-nio-127.0.0.1-8071-exec-44] Timeout: Pool empty. Unable to fetch a connection in 30 seconds, none available[size:100; busy:100; idle:0; lastwait:30000]

数据库

1
2
3
4
5
docker run --name pool-exhausted -p 3306:3306 -e MYSQL_ROOT_PASSWORD=123456 -d mysql:8.0

docker exec -i pool-exhausted mysql -uroot -p123456 <<< "CREATE DATABASE IF NOT EXISTS test_db DEFAULT CHARSET utf8 COLLATE utf8_general_ci;"

docker exec -i pool-exhausted mysql -uroot -p123456 <<< "CREATE TABLE test_db.news (id bigint NOT NULL AUTO_INCREMENT, title varchar(255), content mediumtext, PRIMARY KEY (id)) ENGINE=InnoDB DEFAULT CHARSET=utf8mb4"
1
2
3
4
5
6
7
8
9
10
11
12
13
14
15
16
17
18
19
20
21
22
23
24
25
26
27
28
import base64
import pymysql


def image_to_base64(image_path):
with open(image_path, "rb") as image_file:
encoded_string = base64.b64encode(image_file.read())
return encoded_string.decode('utf-8')

connection = pymysql.connect(host='127.0.0.1',
user='root',
password='123456',
database='test_db')
try:
cursor = connection.cursor()
base64_data = image_to_base64("./content.jpg") # content.jpg大小约为4MB
for i in range(50):
insert_query = "INSERT INTO test_db.news (title, content) VALUES (%s, %s)"
data = ('title' + str(i + 1), base64_data)
cursor.execute(insert_query, data)
connection.commit()
print("数据插入成功!")
except pymysql.Error as error:
connection.rollback()
print("数据插入失败:{}".format(error))
finally:
cursor.close()
connection.close()

服务

1
2
3
4
spring init -j=11 -b=3.1.0 -d=jpa,lombok,mysql,web \
--build=gradle --type=gradle-project \
-a=tutorial -n=tutorial -g=com.tutorial \
pool-exhausted
  • src/main/resources/application.properties
1
2
3
4
5
spring.datasource.url=jdbc:mysql://127.0.0.1:3306/test_db?useUnicode=true&characterEncoding=UTF-8&useSSL=false&allowPublicKeyRetrieval=true
spring.datasource.username=root
spring.datasource.password=123456
spring.jpa.show-sql=true
mybatis-plus.configuration.log-impl=org.apache.ibatis.logging.stdout.StdOutImpl
  • src/main/java/com/tutorial/tutorial/News.java
1
2
3
4
5
6
7
8
9
10
11
12
13
14
15
16
17
18
19
20
21
22
23
24
package com.tutorial.tutorial;

import jakarta.persistence.Column;
import jakarta.persistence.Entity;
import jakarta.persistence.GeneratedValue;
import jakarta.persistence.GenerationType;
import jakarta.persistence.Id;
import jakarta.persistence.Table;
import lombok.Data;

@Entity
@Table(name = "news")
@Data
public class News {
@Id
@GeneratedValue(strategy = GenerationType.IDENTITY)
private Long id;

@Column(length = 255)
private String title;

@Column(columnDefinition = "MEDIUMTEXT")
private String content;
}
  • src/main/java/com/tutorial/tutorial/NewsRepo.java
1
2
3
4
5
6
package com.tutorial.tutorial;

import org.springframework.data.jpa.repository.JpaRepository;

public interface NewsRepo extends JpaRepository<News, Long> {
}
  • src/main/java/com/tutorial/tutorial/NewsController.java
1
2
3
4
5
6
7
8
9
10
11
12
13
14
15
16
17
18
19
20
21
22
23
24
package com.tutorial.tutorial;

import org.springframework.beans.factory.annotation.Autowired;
import org.springframework.data.domain.Page;
import org.springframework.data.domain.PageRequest;
import org.springframework.data.domain.Pageable;
import org.springframework.web.bind.annotation.RestController;
import org.springframework.web.bind.annotation.GetMapping;
import org.springframework.web.bind.annotation.RequestMapping;


@RestController()
@RequestMapping("/news")
public class NewsController {
@Autowired
private NewsRepo newsRepo;

@GetMapping("")
public Page<News> getNews() {
Pageable pageable = PageRequest.of(1, 10);
Page<News> news = newsRepo.findAll(pageable);
return news;
}
}

问题复现

1
./gradlew bootrun
1
ab -n 100 -c 100 "localhost:8080/news"

ERROR 68394 — [io-8080-exec-98] o.a.c.c.C.[.[.[/].[dispatcherServlet] : Servlet.service() for servlet [dispatcherServlet] in context with path [] threw exception [Request processing failed: org.springframework.transaction.CannotCreateTransactionException: Could not open JPA EntityManager for transaction] with root cause java.sql.SQLTransientConnectionException: HikariPool-1 - Connection is not available, request timed out after 30000ms

因不同线程池的实现和策略差异 导致后端服务的结果略有不同

0%